Showing posts with label Google App Engine. Show all posts

Saturday, October 24, 2009

GroovyBot - Developing a Groovy Google Wave Robot

Google Wave is a communication and collaboration tool developed by Google, which is currently in preview and available only to a limited number of users. Last week, I was chosen to be one of those users, and as there's also a Java API available to extend the platform, the first thing that came to my mind was to build a Groovy robot.

This post gives a short introduction of how to build a Google Wave robot. The goal is to build a robot that takes user input as a Groovy script, evaluates it and displays the result back in the wave. To avoid any misunderstanding, the robot itself is not written in Groovy but in Java (shame on me ;-) and uses GroovyShell to evaluate Groovy code. For the impatient (with a Google Wave account) who want try the robot, it's address is groovybot@appspot.com. See the resources section for source code.

Introduction to Google Wave
Google Wave is a communication and collaboration platform, where people can participate in conversations. It's kind of like an e-mail conversation but in real-time like a chat, and much more interactive, with much more features. A conversation, consisting of one or more participants, is called a wave. A wave is a container for wavelets, which are threaded conversations, spawned from a wave. Wavelets are a container for messages, called blips. For more details, see the Google Wave documentation.

Google Wave Extensions
There are two types of Google Wave extensions - gadgets and robots. A gadget basically is a component containing some HTML and JavaScript, that can be included in a wave conversation. But as GroovyBot currently does not make use of gadgets (yet), I won't consider gadgets any further in this post. The other type of wave extension is robots, and as the name suggests, GroovyBot is of this type of extension. A robot is a certain kind of web application that can participate in a wave conversation just as a human participant. And just as a human participant, it can be added to a conversation and then react to certain kinds of events in the wave, e.g. when it's added to the wave or somebody submitted a message (a blip). In response, it can then modifiy the content of the conversation, e.g. by appending content or replacing content.

Getting Started
Currently robots have to be deployed to the Google App Engine. Fortunately, it's really easy to get started with Google App Engine. First you'll need to sign up for an accout. Then with the Eclipse plugin for the app engine create an application, just like shown in this post. This will create a simple Servlet web application, which can immediately be deployed on app engine. But we don't want a simple servlet application. Let's see how to build a wave robot.

Building a Robot
First of all, we need the Google Wave Java Client API, which consists of four jar files, and (for this particular robot) the Groovy jar groovy-all-1.6.5.jar. Place these in the war/lib directory and add them to the build path of your Eclipse project. Then we create the robot, which is simply a class extending AbstractRobotServlet. We'll name it GroovyBotServlet:

public class GroovyBotServlet
extends AbstractRobotServlet {

@Override
public void processEvents(
RobotMessageBundle bundle) {
// TODO
}

}

As said, a robot is basically a wave participant, which can react to certain events happening in the wave conversation. The event handling is done in the processEvents method. All information about the event and the context in which the event ocured, like the wavelet, the blip, the participants and so on, is contained in the RobotMessageBundle parameter. The robot servlet has to be mapped to the URL path /_wave/robot/jsonrpc in the web.xml.

The first thing we'd like to do is to show a simple message in the wave, when the robot is added as a participant. The wave API provides a convenience method called wasSelfAdded to check for this particular event:

public void processEvents(RobotMessageBundle bundle) {

if (bundle.wasSelfAdded()) {
final Blip blip = bundle.getWavelet().appendBlip();
final TextView textView = blip.getDocument();
textView.append("GroovyBot added!");
}

}

So, if the robot was just added to the wave, we get the wavelet in which the event occured, append a blip to it and add the message to the blip's document. The result looks like this:
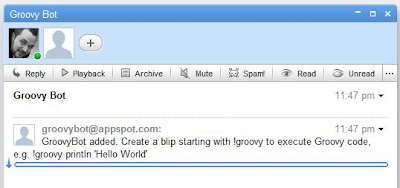

This was easy, and to make the robot run a Groovy script and display the result back in the wave is not much harder.

Executing Groovy Scripts
GroovyBot should not execute all messages submitted to the wave as a Groovy script. Instead, if the user wants the content of a blip to be executed as a script, the blip has to start with the prefix '!groovy' followed by the code, e.g.


The event we want to react to is a BLIP_SUBMITTED event. We have to tell wave that our robot is interested in events of this type by specifying this in the file war/_wave/capabilities.xml:

<?xml version="1.0" encoding="utf-8"?>
<w:robot xmlns:w="http://wave.google.com/extensions/robots/1.0">
<w:capabilities>
<w:capability name="BLIP_SUBMITTED" content="true" />
</w:capabilities>
<w:version>0.1</w:version>
</w:robot>

Then we modify the processEvents method to handle these events:

public void processEvents(
final RobotMessageBundle bundle) {

for (final Event e : bundle.getEvents()) {

if (e.getType() == EventType.BLIP_SUBMITTED) {

// Get input
final Blip inputBlip = e.getBlip();
final TextView inputDocument =
inputBlip.getDocument();
final String inputText = inputDocument.getText();

if (inputText.startsWith("!groovy")) {
final String script = inputText
.substring("!groovy".length());

// Execute script
final GroovyShell shell = new GroovyShell();
final StringBuilder result =
new StringBuilder("Result: ");
try {
result.append(shell
.evaluate(script));
} catch (final Exception ex) {
result.append(e.toString());
}

// Create response
final Blip blip = bundle.getWavelet()
.appendBlip();
blip.getDocument().append(result.toString());
}
}
}

This code first checks if there is an event of type BLIP_SUBMITTED. If so, it gets the blips contents and checks for the prefix "!groovy". Then it removes the prefix, executes the remaining content as a Groovy script with GroovyShell and appends a blip with the result. The output will look like this:
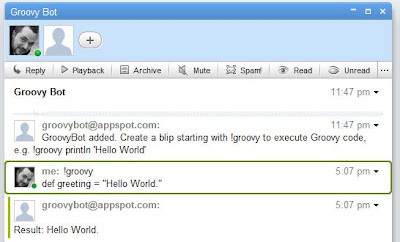


Conclusion
That's basically all, to build a simple Groovy robot. The code above shows a simplified version of GroovyBot which is currently deployed, though. It could be improved in many ways, for example System.out could be captured and also shown in the output. Also, the result could be displayed in another way for a better user experience, for example as a child blip, an inline blip or even as a gadget. But I ran into some issues trying this, for example inline blips were not displayed, or child blips could not be removed and re-added. There are some known bugs in the client API, but all in all, I had a really good experience with wave and its client API. There are many things left, I'd like to do, for example syntax highlighting, using a gadget or making some predefined scripts available, e.g. some DSLs. If you've got some ideas, for example what would be a better user experience, you are welcome. You can start trying GroovyBot right now. It's address is groovybot@appspot.com. Why don't you start with this example, taken from the Practically Groovy series:

!groovy
def zip = "80020"
def addr = "http://weather.yahooapis.com/forecastrss?p=${zip}"
def rss = new XmlSlurper().parse(addr)
def results = rss.channel.item.title
results << "\n" + rss.channel.item.condition.@text
results << "\nTemp: " + rss.channel.item.condition.@temp
println results


Resources
[1] Google Wave
[2] GroovyBot at GitHub (Source Code)
[3] Google Wave Jave Robots Tutorial
[4] Google App Engine


Sunday, July 12, 2009

Wicket, Spring, JDO on Google App Engine - Sample Application

In my previous post on Wicket on Google App Engine I described the basics of how to set up a simple Wicket application that runs on GAE. This post takes the next step and describes how to set up a simple CRUD application. The source code of the sample application is available here.

Overview
The sample application is a simple contacts application, where phone numbers can be associated to persons. It uses Spring for dependency injection and transaction management, JDO for persistence, and Wicket for the presentation layer.

Basic GAE/Wicket Setup
As mentioned, the basic setup of a GAE/Wicket application is the topic this post. So, as described, put the required jars in WEB-INF/lib, set up the appengine-web.xml, set up the Wicket servlet filter in web.xml, set up a Wicket WebApplication class and a home page, set up development mode and turn off the resource modification watcher. After that, you should have a basic application up and running.

Modification Watching
Let's first tackle the one issue left with the basic setup. The resource modification watching is not working, because the Wicket implementation of modification watching uses threads, which is not allowed on app engine. As of version 1.4-RC6, Wicket allows for changing the implementation, so we can write our own that does not use threads and set it in our application's init() method. The sample application uses a custom WebRequestCycle to call the modification watcher on each request.

Note: If you are using an earlier version of Wicket (pre 1.4-RC6), there's a workaround. Simply put the custom modification watcher in the same location on the classpath as the Wicket one. You can do this, by setting up your own org.apache.wicket.util.watch.ModificationWatcher in your project, which replaces the Wicket implementation.

The sample application's code to setup the custom modification watcher looks like this.

public class WicketApplication extends WebApplication {

@Override
protected void init() {
getResourceSettings().setResourceWatcher(
new GaeModificationWatcher());
}

@Override
public RequestCycle newRequestCycle(final Request request,
final Response response) {
return new MyWebRequestCycle(this, (WebRequest) request,
(WebResponse) response);
}


with a custom WebRequestCycle, that calls the modification watcher on each request (in development mode):

class MyWebRequestCycle extends WebRequestCycle {

MyWebRequestCycle(final WebApplication application,
final WebRequest request, final Response response) {
super(application, request, response);
}

@Override
protected void onBeginRequest() {
if (getApplication().getConfigurationType() == Application.DEVELOPMENT) {
final GaeModificationWatcher resourceWatcher = (GaeModificationWatcher) getApplication()
.getResourceSettings().getResourceWatcher(true);
resourceWatcher.checkResources();
}

}
}


Spring / JDO transaction management
First things first. Let's configure Spring for dependency injection and transaction handling. Our goal is to set up a JDO persistence manager factory bean, so we can persist our entities to the datastore. First step is to put the spring jars (and others: cglib, commons-logging, ..) along with the wicket-ioc and wicket-spring jars into WEB-INF/lib and include them on the classpath in our Eclipse project. Then we set up web.xml to configure a ContextLoaderListener and use the Wicket Application.init() method to setup Wicket/Spring annotation-driven dependency injection:

@Override
protected void init() {
addComponentInstantiationListener(new SpringComponentInjector(this));
}


Then we need an application context xml configuration file. This should look like this:

<tx:annotation-driven />

<bean id="persistenceManagerFactory"
class="org.springframework.orm.jdo.LocalPersistenceManagerFactoryBean">
<property name="persistenceManagerFactoryName"
value="transactions-optional" />
</bean>

<bean id="transactionManager"
class="org.springframework.orm.jdo.JdoTransactionManager">
<property name="persistenceManagerFactory" ref="persistenceManagerFactory" />
</bean>


On GAE we cannot use component-scanning or annotation-driven configuration with <configuration:annotation-driven/>, since this introduces a dependency on javax.Naming, which is not on the GAE whitelist. So we have to configure our beans through XML. But we can use annotation-driven transaction configuration.

For persistence I chose JDO instead of JPA. GAE is backed by BigTable as a datastore, and since BigTable isn't a relational database, I thought JDO might be a better fit. But JPA might be a good choice, as well. For JDO we have to configure a LocalPersistenceManagerFactoryBean and a JDO transaction manager. The factory's name must match the name in the jdoconfig.xml file, which is normally created by the Eclipse plugin. The sample application also contains a simple persistence manager factory bean for JPA, that works on GAE.

After that we can create transactional services and DAOs as Spring beans. But first, let's set up a simple, persistable domain model.

Domain Model / Persistence
Our first persistable domain object class is a person pojo entity with some JDO annotations, the persistence meta data (similar to JPA):

@PersistenceCapable(identityType = IdentityType.APPLICATION)
public class Person {

@PrimaryKey
@Persistent(valueStrategy = IdGeneratorStrategy.IDENTITY)
private Long id;

@Persistent
private String firstName;

@Persistent
private String lastName;

@Persistent
private Date birthday;

public Person() {
super();
}

public Person(final Date birthday,
final String firstName,
final String lastName) {
super();
this.birthday = birthday;
this.firstName = firstName;
this.lastName = lastName;
}

public Long getId() {
return id;
}

// ... Getters and Setters


All persistent entities have to be annotated with @PersistenceCapable. The primary key is annotated with @PrimaryKey. On GAE/BigTable primary keys have special semantics in addition to just uniquely identifying an entity, see the GAE documentation for details. For this example, we'll keep things simple and just choose the primary key to be of type Long (we'll change that later for some reason). All persistent fields have to be annotated with @Persistent.

That's it, for this simple entity for now. Let's go for actually persisting it to the database.

Persisting entities
The sample application uses a PersonDAO to persist person entities. This DAO could inherit from Spring's JdoDaoSupport base class, but we can also do it without it. So, our DAO might look like this:

public class PersonDao /* extends JdoDaoSupport */
implements IPersonDao {

private PersistenceManagerFactory pmf;

@Override
public Person makePersistent(final Person person) {
return getPersistenceManager().makePersistent(
person);
}

private PersistenceManager getPersistenceManager() {
return PersistenceManagerFactoryUtils
.getPersistenceManager(pmf, true);
}

public void setPmf(final PersistenceManagerFactory pmf) {
this.pmf = pmf;
}

}

The PersistenceManagerFactory will be injected by Spring. If you look at the getPersistenceManagerFactory() method you'll notice, that it's not just pmf.getPersistenceManager(), instead it calls PersistenceManagerFactoryUtils to get a persistence manager. This way we get a persistence manager that participates in Spring's transaction handling, which cares for opening and closing the persistence manager and transaction handling on our behalf.

We configure this DAO by defining it as a Spring bean in the application context xml file and inject the PersistenceManagerFactory. We can then use the makePersistent(person) method to persist person instances.

At this point we could now easily implement a simple Wicket form to create new person instances. But I'll leave this task up to you (or have a look at the sample application).

Retrieving Entities
But let's have a closer look at JDO, for those not familiar with it (like me). What we'll probably want to do, for example, is to query a single person by ID or to find all persons, applying some paging parameters. Here are some sample methods from the Person DAO to get an impression of JDO:

public Person get(final Long id) {
final Person person = getPersistenceManager()
.getObjectById(Person.class, id);
return getPersistenceManager().detachCopy(person);
}

@Override
public int countPersons() {
final Query query = getPersistenceManager()
.newQuery(Person.class);
query.setResult("count(id)");
final Integer res = (Integer) query.execute();
return res;
}

@SuppressWarnings("unchecked")
public List<Person> findAllPersons() {
final Query query = getPersistenceManager()
.newQuery(Person.class);
query.setOrdering("lastName asc");
final List<Person> list = (List<Person>) query
.execute();
return Lists.newArrayList(getPersistenceManager()
.detachCopyAll(list));
}

@Override
@SuppressWarnings("unchecked")
public List<Person> findAllPersons(final int first,
final int count) {
final Query query = getPersistenceManager()
.newQuery(Person.class);

query.setOrdering("lastName asc");
query.setRange(first, first + count);

final List<Person> list = (List<Person>) query
.execute();
return Lists.newArrayList(getPersistenceManager()
.detachCopyAll(list));
}

For further details about querying with JDO, see the resources section below. Especially for JDO on GAE, there are quite some restrictions. I think, for example, it's not possible to do something like wildcard matching in queries.

One word on detaching: all the DAO methods above detach the retrieved entities before returning them to the caller by calling detachCopy or detachCopyAll. This way the entities are detached from the persistence manager that fetched them. These instances can then be modified by the web layer and passed back to another persistence manager instance in order to update their database representation. The sample application uses the OpenPersistenceManagerInView pattern instead, configured in web.xml. This way, a persistence manager instance is opened at the beginning of the request and closed afterwards, so the web layer can freely navigate the object graph.

Mapping relationships
Let's add a simple relationship to our domain model. Assume a person has a one-to-many relationship to phone numbers. In GAE such a relationship could be owned or unowned. In an owned relationship the entities on the one side are the parents of the associated entities, which are then called child entities in this relationship. Child entities in an owned relationship cannot exist without their parents. For more information on the different types of relationships and their transaction semantics, see the GAE documentation. The following relationship between persons and phone numbers is an owned, bi-directional one-to-many relationship.

@PersistenceCapable(identityType = IdentityType.APPLICATION)
public class PhoneNumber {

@PrimaryKey
@Persistent(valueStrategy = IdGeneratorStrategy.IDENTITY)
private Key key;

@Persistent
private String type;

@Persistent
private String number;

@Persistent
private Person person;

//...


The phone number has a field person of type Person, annotated with @Persistent. This makes phone number a child entity of person. You'll notice the field key of type Key. This is a possible type for primary keys in the GAE. We cannot use Long in this case, because phone number is a child entity of person and as such its primary key has to contain the key of its parent (see the docs).

Note: For root entities, it's normally okay to use a key of type Long, but this did not work in my example, so I changed the key of Person to Key, too.


public class Person {

@PrimaryKey
@Persistent(valueStrategy = IdGeneratorStrategy.IDENTITY)
private Key key;

@Persistent
private String firstName;

@Persistent
private String lastName;

@Persistent
private Date birthday;

@Persistent(mappedBy = "person")
private List<PhoneNumber> phoneNumbers = Lists.newArrayList();

// ...


The relationship is made bi-directional by adding a list of phone numbers to the person class. The mappedBy parameter denotes the property of PhoneNumber that points to the person. With this, we can now add phone numbers to persons and these will be persisted to the database along with the owning person.

Note: Somehow there's an issue with removing phone numbers from the list by calling person.getPhoneNumbers().remove(phoneNumber), which throws an exception. But removing it by its index works, though. Let me say, that this was not the only time I had problems with the datastore. I have quite a feeling that there are still some open issues in this area.

UserService
To close this post, I'll shortly describe GAE's simple support for authentication. In a GAE application users may login with their Google account.

Checking, if a user is logged in, is easy:

final UserService userService = UserServiceFactory.getUserService();
boolean loggedIn = userService.isUserLoggedIn();


Accessing the current user's details is also easy:

User currentUser = userService.getCurrentUser();
String email = currentUser.getEmail();
String nickname = currentUser.getNickname();


And redirecting a user to a login/logout URL in Wicket can be done e.g. with a ExternalLink:

class LoginLink extends ExternalLink {

private static final long serialVersionUID = 1L;

LoginLink(final String id) {
super(id, getURL());
add(new Label("label", new LoginLabelModel()));
}

public static String getURL() {

final RequestCycle requestCycle = RequestCycle.get();

// Get the URL of this app to redirect to it
final WebRequest request = (WebRequest) requestCycle.getRequest();
final HttpServletRequest req = request.getHttpServletRequest();
final String appUrl = req.getRequestURL().toString();

// Create the login/logout page URL with with redirect tho this app
final String targetUrl = getUserService().isUserLoggedIn() ? loginUrl(appUrl)
: logoutUrl(appUrl);

return targetUrl;

}


Resources
[1] The sample application source code
[2] Apache JDO
[3] JDO Spec
[4] GAE datastore docs


Thursday, April 9, 2009

Wicket on Google App Engine

Google App Engine now supports Java. Let's get Wicket running on it, quickly.

Note: This post covers the basics of setting up Wicket on GAE. This subsequent post takes the next steps of setting up Spring and persistence with JDO and provides the source code of a sample application.

1. Use the Eclipse plugin to create a project
The Eclipse plugin can be installed via Eclipse Update Manager and it includes a Google App Engine SDK, so you don't need to install that separately. With the plugin, create a "New Web Application Project".


Uncheck "Use Google Web Toolkit" and leave "Use Google App Engine" activated. The project will contain a src folder and war folder. It contains a simple "Hello, World" example and you can run it immediately. But let's get Wicket running, quickly.


2. Add Wicket jars
Add the following jars to the war/WEB-INF/lib directory and add them as external jars to the eclipse project:

- wicket-1.3.5.jar
- slf4j-api-1.5.2.jar
- slf4j-log4j12-1.4.2.jar
- log4j-1.2.13.jar


3. Turn on logging
Turn on logging, so that you can see any strange things, that may occur. App Engine won't tell you much by default.

- log4j.properties: log4j.logger.org.apache.wicket=DEBUG, A1
- java6 logging.properties: .level = INFO

4. Create a Wicket Application and a Page
Add WicketApplication.java

package wicket;

public class WicketApplication extends WebApplication {
public Class getHomePage() {
return HomePage.class;
}
}

and a simple HomePage.java and HomePage.html:

public class HomePage extends WebPage {
public HomePage() {
add(new Label("label", new Model("Hello, World")));
}
}


5. Set up WicketFilter
Add the Wicket servlet filter to web.xml. Alternatively use WicketServlet:


WicketFilter
org.apache.wicket.protocol.http.WicketFilter

applicationClassName
wicket.WicketApplication


WicketFilter
/wicket/*


6. Add HTTP session support
Enable HTTP session support (by default it's disabled) by adding the following line to appengine-web.xml:

true


Now the app is ready to run, but there are still some issues.

7. Disable resource modification watching
When Wicket is started in development mode now, exceptions are raised because Wicket spawns threads to check resource files such as HTML files for modifications. Let's just disable resource modification checking by setting the resource poll frequency in our WicketApplication's init() method to null.

protected void init() {
getResourceSettings().setResourcePollFrequency(null);
}

8. Disable SecondLevelCacheSessionStore
We cannot use the SecondLevelCacheSessionStore in the app engine, which is the default. At least not with a DiskPageStore, because this serializes the pages to the disk. But writing to the disk is not allowed in the app engine. You can use the simple HttpSessionStore implementation instead (this increases HTTP session size), by overriding newSessionStore() in our WicketApplication:

protected ISessionStore newSessionStore() {
//return new SecondLevelCacheSessionStore(this, new DiskPageStore());
return new HttpSessionStore(this);
}


9. Run
From the context menu of the project, call Run As -> Web Application. Open http://localhost:8080/wicket/ in your browser and see the app running.


Download the demo as an eclipse poject.