Wednesday, December 16, 2009

Lift from a Wicket Developer's Perspective

I've been messing around with Scala again lately. After learning the basics of the Scala language, I decided to have a look at the lift web framework - "the simply functional web framework". In this highly subjective post I will outline, why I'll stick with Wicket.

My Lift Experience


To be clear, I'm not an experienced Scala developer. I did my first steps in Scala a year ago or so, and I just started learning Lift by having a look at the getting started guide. But this short first impression was enough for me to decide, that I'm not going any further with lift. Without going into much detail, here's why:

  • Lift is a template driven framework, whereas Wicket is component based. In Lift you compose a page of (X)HTML templates, called snippets. In Wicket you compose a page of components, i.e. not through (X)HTML but through an object graph/hierarchy. Lift's template approach allows for reusable templates, but I like the Wicket's object oriented, hierarchical approach much more.

  • There's not much documentation on Lift. There is the getting started guide, but the examples did not work immediately, because the API had changed. This troubled me a lot. Also, there's not much documentation in the source code.

  • A positive aspect of Lift is that it comes with an integrated OR-Mapping API, which looks quite interesting. Also there's a nice query API that can be compared to Hibernate's criteria API, and at first glance it looks even nicer. I heard that lift also runs on Google App Engine (?). I wonder, though, how hard it was to get this integrated OR-Mapping/Query API to run on GAE.

  • The model/entity classes have too many responsibilities. They contain validation logic and OR-mapping logic. This is okay so far. But there's also conversion logic in there, e.g. from String to the specific data type, and there's also code for HTML and even JavaScript generation. The MappedBoolean class for example, which is used to represent a boolean property of an entity, also has methods like toForm, which yields a (X)HTML checkbox element, and asJsExp, which yields the corresponding JavaScript expression of the value. I'd rather seperate these responsibilities into more than one class.

  • In general, the seperation of presentation content and logic is not quite as good as stated in the getting started guide. Here is an example snippet from the getting started guide:

    Without getting into the details, this method contains presentation logic in the form of HTML span elements and a checkbox input element generated by the ajaxText call. Actually, these aren't really HTML element strings in the code but this is Scala's XML support. But that does not make it better, right? You'll never - well, almost never - see such things in Wicket.

  • Lift is a Scala web framework, Wicket is Java. And although Scala in general is a great language and superior to Java in many aspects, I'm still not quite sure whether it will become my first language of choice ever. I still have some issues with it.

  • Related to this is the tooling aspect. The IDEs (Eclipse, IDEA) still lack full support for the Scala language. Maven support for Scala/Lift is quite good, though.


So, this is was my first impression of Lift. Don't get this wrong, Lift has some interesting aspects and in some ways it's much better than many other Java frameworks. But if I had to choose a web framework for a green field project right now, I'd certainly go with Wicket.


Friday, November 13, 2009

Concurrency is not such a big Deal ...

... when it comes to web development.

In the current debate about the future of Java (Java the language, of course) and which alternative language would be an appropriate successor of Java (Scala, Clojure, ...), much of the discussion focuses on the question, which language provides the better concurrency model in order to utilize multi-core processors in the future. Actually, I'm not an expert in concurrency, and concurrency clearly is really hard to get right (at least in Java), but usually in web applications - and this is quite a huge part of the Java applications out there - concurrency is not such a big deal, even despite the fact, that web applications are one of the most concurrently running kind of applications.

Concurrency in typical web applications
Surely, most web developers know exactly how to tackle concurrency in web applications. It's not that hard. But for the fun it, let's have a closer look. In a web application client requests are handled by the app server concurrently, each in its own thread, possibly distributed among cpu cores. So generally, there are two situations, where threads run simultaneously:

  • Two or more requests of different clients

  • Two or more requests of the same client

These threads may possibly access (read and write) shared state. And concurrency is hard mainly because of mutable state, accessed by different threads simultaneously. But let's put it another way then:

  • Concurrency isn't hard for immutable state and

  • Concurrency isn't hard for state that is not accessed by different threads simultaneously (mutable or not)

Now let's have a look at what types of state there are in a typical web application and how it is accessed by different threads:

State of the current request

This is for example data needed to generate the response of the request, status of the request, and so on. In most cases, this kind of state is only available to a single thread, i.e. not accessed simultaneously. This is guaranteed by all application servers for request state held in the app server. And this is guaranteed by all web frameworks (also with front controller pattern) for request state held there. The developer has to take care not to store request state where it can be accessed by other request threads. This is neither hard to understand nor hard to accomplish.

Application state held in the application server or in the web framework

Examples are ServletContext or web framework settings. This is mostly static state that will be initialized at startup but won't be mutated in the lifetime of the application. Otherwise, the application server/web framework will take care that this kind of state is accessed in a thread-safe way.

Conversational state

HTTP is stateless. There is no conversational state. There is not even a conversation. Unfortunately, this is not exactly true in most web applications, as most applications will store some kind of conversational state in the HTTP session. This type of state might be accessed simultaneously by multiple threads, but only by threads spawned by the same client. In most applications concurrent access to this state is rare and might be well supported by the web framework. Nonetheless, this is state the developer has to take care of.

Application state persisted to the database (business state)

In fact, this state is read and mutated highly concurrently by different threads. Fortunately, most persistence frameworks support the unit of work pattern: State is replicated from the database for each thread accessing it (as a copy). The thread modifies it and writes it back in a database transaction. Modifying state in this way (in a transaction) is an appropriate concurrency strategy. See also software transactional memory (STM), which is supported e.g. by Clojure.

"Classical" concurrently accessed state

For example heavy calculations done explicitly concurrently. In web applications, a request might spawn several other threads to do an expensive calculation. This is the "classical" case, where thread programming might surely become hard. This is definitively a situation where Scala or Closure or any other language with a better concurrency model might be appropriate.


Summary
In summary, if there is no state, there is no problem. Immutable state is also not a problem. State, that is only accessed by a single thread is no problem. And state that is modified in a unit of work/transaction is not a problem. And in web applications most state is of one of these kinds (and by the way, this is mostly because of the stateless, request based nature of HTTP). In this sense, Java is quite well prepared for the multi-core future in the field of web applications, although other JVM languages might have the better concurrency model. Nonetheless, there are some even better arguments than concurrency for some alternative languages, for example expressiveness, conciseness or productivity in general.


Update: I did a "prezi" of this post. What a fun tool! See here.


Monday, October 26, 2009

A Scala Console with JavaFX (Experimental)

It's been a while ago, when I started implementing a Scala console with JavaFX. And orginally I've never thought about publishing it, because it was (and still is) an experimental, personal project. But today I started playing around with it again, and I decided to push it to github and write a short post on it. So, if you are interested, you are welcome to read the source code, try out the application and give some feedback.

The JavaFX part
For the JavaFX part of the app, which is of course the UI part, I used Netbeans. It simply consists of a textarea for the input, another textarea for the output and a toolbar to execute the input or clear the input.


Admittedly, the UI could be much nicer, especially with JavaFX. But as said, this was just an experiment and I'm not quite a UI guy.

One thing that struck me, was that JavaFX did not have a textarea component. At least at the time I was building the application. I can't say, if there is one today. Fortunately, I found a blog post on the web (but I can't find it anymore), where the author describes how to wrap a Swing textarea into a JavaFX component. This worked quite nice. Adding some JavaFX binding and some event handling functions to the buttons, and the UI part was working. Doing the design part with JavaFX was real fun.

The Scala Part
I implemented the interpreter part in Scala as a separate project in Eclipse. I also used Maven with maven-scala-plugin. I had some issues with the Eclipse Scala plugin, but the Maven plugin worked quite nice. Scala comes with an Interpreter class to interprete Scala code. It would be really simple to execute a whole script at once with the interpreter, but I wanted the application to interprete the code line by line, just as the the Scala console does that comes bundled with the Scala distribution. So, I used Scala's case class pattern matching do accomplish this, see the source code for more details.

Bringing it together
There's nothing special to bring the two parts together as everything runs on the JVM. I bundled the Scala part into a jar with Maven and added it together with the Scala jars to the JavaFX project. Instantiating the Scala classes from JavaFX is nothing more than calling new.

Resources
[1] Project (Source code and WebStart) at github


Saturday, October 24, 2009

GroovyBot - Developing a Groovy Google Wave Robot

Google Wave is a communication and collaboration tool developed by Google, which is currently in preview and available only to a limited number of users. Last week, I was chosen to be one of those users, and as there's also a Java API available to extend the platform, the first thing that came to my mind was to build a Groovy robot.

This post gives a short introduction of how to build a Google Wave robot. The goal is to build a robot that takes user input as a Groovy script, evaluates it and displays the result back in the wave. To avoid any misunderstanding, the robot itself is not written in Groovy but in Java (shame on me ;-) and uses GroovyShell to evaluate Groovy code. For the impatient (with a Google Wave account) who want try the robot, it's address is groovybot@appspot.com. See the resources section for source code.

Introduction to Google Wave
Google Wave is a communication and collaboration platform, where people can participate in conversations. It's kind of like an e-mail conversation but in real-time like a chat, and much more interactive, with much more features. A conversation, consisting of one or more participants, is called a wave. A wave is a container for wavelets, which are threaded conversations, spawned from a wave. Wavelets are a container for messages, called blips. For more details, see the Google Wave documentation.

Google Wave Extensions
There are two types of Google Wave extensions - gadgets and robots. A gadget basically is a component containing some HTML and JavaScript, that can be included in a wave conversation. But as GroovyBot currently does not make use of gadgets (yet), I won't consider gadgets any further in this post. The other type of wave extension is robots, and as the name suggests, GroovyBot is of this type of extension. A robot is a certain kind of web application that can participate in a wave conversation just as a human participant. And just as a human participant, it can be added to a conversation and then react to certain kinds of events in the wave, e.g. when it's added to the wave or somebody submitted a message (a blip). In response, it can then modifiy the content of the conversation, e.g. by appending content or replacing content.

Getting Started
Currently robots have to be deployed to the Google App Engine. Fortunately, it's really easy to get started with Google App Engine. First you'll need to sign up for an accout. Then with the Eclipse plugin for the app engine create an application, just like shown in this post. This will create a simple Servlet web application, which can immediately be deployed on app engine. But we don't want a simple servlet application. Let's see how to build a wave robot.

Building a Robot
First of all, we need the Google Wave Java Client API, which consists of four jar files, and (for this particular robot) the Groovy jar groovy-all-1.6.5.jar. Place these in the war/lib directory and add them to the build path of your Eclipse project. Then we create the robot, which is simply a class extending AbstractRobotServlet. We'll name it GroovyBotServlet:

public class GroovyBotServlet
extends AbstractRobotServlet {

@Override
public void processEvents(
RobotMessageBundle bundle) {
// TODO
}

}

As said, a robot is basically a wave participant, which can react to certain events happening in the wave conversation. The event handling is done in the processEvents method. All information about the event and the context in which the event ocured, like the wavelet, the blip, the participants and so on, is contained in the RobotMessageBundle parameter. The robot servlet has to be mapped to the URL path /_wave/robot/jsonrpc in the web.xml.

The first thing we'd like to do is to show a simple message in the wave, when the robot is added as a participant. The wave API provides a convenience method called wasSelfAdded to check for this particular event:

public void processEvents(RobotMessageBundle bundle) {

if (bundle.wasSelfAdded()) {
final Blip blip = bundle.getWavelet().appendBlip();
final TextView textView = blip.getDocument();
textView.append("GroovyBot added!");
}

}

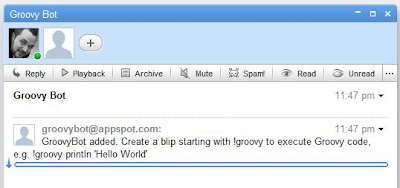
So, if the robot was just added to the wave, we get the wavelet in which the event occured, append a blip to it and add the message to the blip's document. The result looks like this:


This was easy, and to make the robot run a Groovy script and display the result back in the wave is not much harder.

Executing Groovy Scripts
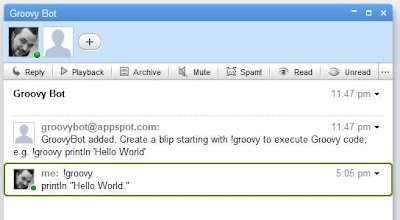
GroovyBot should not execute all messages submitted to the wave as a Groovy script. Instead, if the user wants the content of a blip to be executed as a script, the blip has to start with the prefix '!groovy' followed by the code, e.g.


The event we want to react to is a BLIP_SUBMITTED event. We have to tell wave that our robot is interested in events of this type by specifying this in the file war/_wave/capabilities.xml:

<?xml version="1.0" encoding="utf-8"?>
<w:robot xmlns:w="http://wave.google.com/extensions/robots/1.0">
<w:capabilities>
<w:capability name="BLIP_SUBMITTED" content="true" />
</w:capabilities>
<w:version>0.1</w:version>
</w:robot>

Then we modify the processEvents method to handle these events:

public void processEvents(
final RobotMessageBundle bundle) {

for (final Event e : bundle.getEvents()) {

if (e.getType() == EventType.BLIP_SUBMITTED) {

// Get input
final Blip inputBlip = e.getBlip();
final TextView inputDocument =
inputBlip.getDocument();
final String inputText = inputDocument.getText();

if (inputText.startsWith("!groovy")) {
final String script = inputText
.substring("!groovy".length());

// Execute script
final GroovyShell shell = new GroovyShell();
final StringBuilder result =
new StringBuilder("Result: ");
try {
result.append(shell
.evaluate(script));
} catch (final Exception ex) {
result.append(e.toString());
}

// Create response
final Blip blip = bundle.getWavelet()
.appendBlip();
blip.getDocument().append(result.toString());
}
}
}

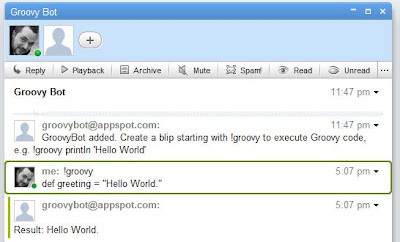
This code first checks if there is an event of type BLIP_SUBMITTED. If so, it gets the blips contents and checks for the prefix "!groovy". Then it removes the prefix, executes the remaining content as a Groovy script with GroovyShell and appends a blip with the result. The output will look like this:


Conclusion
That's basically all, to build a simple Groovy robot. The code above shows a simplified version of GroovyBot which is currently deployed, though. It could be improved in many ways, for example System.out could be captured and also shown in the output. Also, the result could be displayed in another way for a better user experience, for example as a child blip, an inline blip or even as a gadget. But I ran into some issues trying this, for example inline blips were not displayed, or child blips could not be removed and re-added. There are some known bugs in the client API, but all in all, I had a really good experience with wave and its client API. There are many things left, I'd like to do, for example syntax highlighting, using a gadget or making some predefined scripts available, e.g. some DSLs. If you've got some ideas, for example what would be a better user experience, you are welcome. You can start trying GroovyBot right now. It's address is groovybot@appspot.com. Why don't you start with this example, taken from the Practically Groovy series:

!groovy
def zip = "80020"
def addr = "http://weather.yahooapis.com/forecastrss?p=${zip}"
def rss = new XmlSlurper().parse(addr)
def results = rss.channel.item.title
results << "\n" + rss.channel.item.condition.@text
results << "\nTemp: " + rss.channel.item.condition.@temp
println results


Resources
[1] Google Wave
[2] GroovyBot at GitHub (Source Code)
[3] Google Wave Jave Robots Tutorial
[4] Google App Engine


Tuesday, August 18, 2009

Scala Tail Recursion

If you are into Scala, then you eventually may have heard about tail recursion or especially tail call optimization. This post sheds some light on what tail recursion is and on Scala's ability to optimize tail recursive functions.

Tail recursive functions
In Scala it is common to write in a functional style, and recursion is a technique frequently used in functional programming. A recursive function is a function that calls itself (directly or indirectly). Let's take for example the following factorial function:

def rfak(n: Int): Int = {
if (n == 1) n
else n * rfak(n-1)
}

This function calls itself recursively until its parameter n is down to one. The recursive calculation runs like this: rfak(3) = 3*(rfak(2)) = 3*(2*rfak(1)) = 3*(2*(1)) = 6.

Now, the function as shown above is a recursive function, but it is not tail recursive. In a tail recursive function the recursive call is the last action in the execution of the function's body. In the expression n * rfak(n-1), though, first the recursive call is made, and then (as the last action) the result of that call is multiplied by n. So the function is not tail recursive, because the recursive call is not the last action. But we can transform the implementation above into a tail recursive function:

def ifak(n: Int, acc: Int):Int = {
if (n == 1) acc
else ifak(n-1, n*acc)
}

We introduced a second parameter acc. n is like before, but acc (the accumulator) holds intermediate results of the calculation. In this case, in the else part, the recursive call is the last action in the execution of the body, so the function is tail recursive. The calculation process goes like this: ifak(3,1) = ifak(2,3) = ifak(1,6) = 6.

The benefit of tail recursion
So, why would one care if a recursive function is even tail recursive?

If you have a look at how the calculation goes on, again, you will notice, that in the non tail recursive way, the process has to "remember" intermediate results, and that (in consequence) the recursive calls have to be "stacked" until all recursive calls have been made. Then the final result can be calculated: rfak(3) = 3*(rfak(2)) = 3*(2*rfak(1)) = 3*(2*(1)) = 6.

This is not the case with tail recursive functions, as you can see in the process of the second calculation: ifak(3,1) = ifak(2,3) = ifak(1,6) = 6. There are no intermediate results (except for the accumulator argument) and the recursive calls are not stacked (This is why the process of a tail recursive function is also called iterative). In consequence, tail recursive functions are far less expensive regarding memory consumption, at least in theory.

Tail recursive functions in Java
Unfortunately, the JVM does not optimize tail calls itself. For example, if we had implemented the tail recursive factorial function in Java,

public static int ifak(int n, int acc) {
if (n == 1) return acc;
else return ifak(n - 1, acc * n);
}

then for each recursive call a new stack frame is built, which will slow down the calculation and will eventually lead to a StackOverflowError for reasonably large numbers of n. You can also watch this behavior in a debugger, or if you interrupt the calculation, for example by throwing an exception.

public static int ifak(int n, int acc) {
if (n == 1) return acc;
if (n == 10) throw new RuntimeException();
else return ifak(n - 1, acc * n);
}

Then the stacktrace will look like this, showing that the function is called again and again:

Exception in thread "main" java.lang.RuntimeException
at FakTestJava.ifak(FakTestJava.java:32)
at FakTestJava.ifak(FakTestJava.java:33)
at FakTestJava.ifak(FakTestJava.java:27)
at FakTestJava.main(FakTestJava.java:15)

The disassembled byte code instructions, generated by javac, proves this:

public static int ifak(int, int);
Code:
0: iload_0
1: iconst_1
2: if_icmpne 7
5: iload_1
6: ireturn
7: iload_0
8: iconst_1
9: isub
10: iload_1
11: iload_0
12: imul
13: invokestatic #6; //Method ifak:(II)I
16: ireturn

The recursive call is the second last instruction.

Tail call optimization in Scala
Now let's have a look at the byte codes the Scala compiler generated from the code above. Here's the tail recursive code again:

def ifak(n: Int, acc: Int):Int = {
if (n == 1) acc
else ifak(n-1, n*acc)
}

And here are the instructions that comprise the byte codes:

public int ifak(int, int);
Code:
0: iload_1
1: iconst_1
2: if_icmpne 7
5: iload_2
6: ireturn
7: iload_1
8: iconst_1
9: isub
10: iload_1
11: iload_2
12: imul
13: istore_2
14: istore_1
15: goto 0

As you can see, there are no recursive calls anymore. Instead there is a goto as the last instruction, which makes the process simply jump back to the beginning of the function. So, in this case the execution really runs in an iterative process, which is far more efficient than recursively calling the function again, while building new stack frames.

In fact, this is a feature of the Scala compiler called tail call optimization. It optimizes away the recursive call. This feature works only in simple cases as above, though. If the recursion is indirect, for example, Scala cannot optimize tail calls, because of the limited JVM instruction set.


That's essentially it, but if you are interested, let's go and fiddle some more with it. We could do the same as in the Java example above to prove, that there are no additional recursive calls. For example, if you'd throw a runtime exception in the process like this:

def ifak(n: Int, acc: Int):Int = {
if (n == 1) acc
if (n == 2) throw new RuntimeException()
else ifak(n-1, n*acc)
}

and call ifak(10,1) the stacktrace will also tell you that there are no additional stackframes built:

Exception in thread "main" java.lang.RuntimeException
at scalaapplication1.FakTest$.ifak(FakTest.scala:32)
at scalaapplication1.FakTest$.main(FakTest.scala:16)
at scalaapplication1.FakTest.main(FakTest.scala)

But you can also turn off the tail call optimization with a -g:notailcalls flag to the scala compiler. If you run the example again, then the stacktrace will look like this:

java.lang.RuntimeException
at scalaapplication1.FakTest$.ifak(FakTest.scala:32)
at scalaapplication1.FakTest$.ifak(FakTest.scala:33)
at scalaapplication1.FakTest$.main(FakTest.scala:16)
at scalaapplication1.FakTest.main(FakTest.scala)

Finally, let's have a look at how the code looks like when we decompile the class file using a Java decompiler like jd (http://java.decompiler.free.fr/). Here is the code once again:

def ifak(n: Int, acc: Int):Int = {
if (n == 1) acc
else ifak(n-1, n*acc)
}

And here is what jd decompiles from the class file:

public int ifak(int n, int acc) {
while (true) {
if (n == 1) return acc;
acc = n * acc;
n -= 1;
}
}

The tail recursive calls are transformed into an equivalent while loop!

After all, this should not be too surprising.

Resources
[1] Tail calls in the VM


Sunday, July 12, 2009

Wicket, Spring, JDO on Google App Engine - Sample Application

In my previous post on Wicket on Google App Engine I described the basics of how to set up a simple Wicket application that runs on GAE. This post takes the next step and describes how to set up a simple CRUD application. The source code of the sample application is available here.

Overview
The sample application is a simple contacts application, where phone numbers can be associated to persons. It uses Spring for dependency injection and transaction management, JDO for persistence, and Wicket for the presentation layer.

Basic GAE/Wicket Setup
As mentioned, the basic setup of a GAE/Wicket application is the topic this post. So, as described, put the required jars in WEB-INF/lib, set up the appengine-web.xml, set up the Wicket servlet filter in web.xml, set up a Wicket WebApplication class and a home page, set up development mode and turn off the resource modification watcher. After that, you should have a basic application up and running.

Modification Watching
Let's first tackle the one issue left with the basic setup. The resource modification watching is not working, because the Wicket implementation of modification watching uses threads, which is not allowed on app engine. As of version 1.4-RC6, Wicket allows for changing the implementation, so we can write our own that does not use threads and set it in our application's init() method. The sample application uses a custom WebRequestCycle to call the modification watcher on each request.

Note: If you are using an earlier version of Wicket (pre 1.4-RC6), there's a workaround. Simply put the custom modification watcher in the same location on the classpath as the Wicket one. You can do this, by setting up your own org.apache.wicket.util.watch.ModificationWatcher in your project, which replaces the Wicket implementation.

The sample application's code to setup the custom modification watcher looks like this.

public class WicketApplication extends WebApplication {

@Override
protected void init() {
getResourceSettings().setResourceWatcher(
new GaeModificationWatcher());
}

@Override
public RequestCycle newRequestCycle(final Request request,
final Response response) {
return new MyWebRequestCycle(this, (WebRequest) request,
(WebResponse) response);
}


with a custom WebRequestCycle, that calls the modification watcher on each request (in development mode):

class MyWebRequestCycle extends WebRequestCycle {

MyWebRequestCycle(final WebApplication application,
final WebRequest request, final Response response) {
super(application, request, response);
}

@Override
protected void onBeginRequest() {
if (getApplication().getConfigurationType() == Application.DEVELOPMENT) {
final GaeModificationWatcher resourceWatcher = (GaeModificationWatcher) getApplication()
.getResourceSettings().getResourceWatcher(true);
resourceWatcher.checkResources();
}

}
}


Spring / JDO transaction management
First things first. Let's configure Spring for dependency injection and transaction handling. Our goal is to set up a JDO persistence manager factory bean, so we can persist our entities to the datastore. First step is to put the spring jars (and others: cglib, commons-logging, ..) along with the wicket-ioc and wicket-spring jars into WEB-INF/lib and include them on the classpath in our Eclipse project. Then we set up web.xml to configure a ContextLoaderListener and use the Wicket Application.init() method to setup Wicket/Spring annotation-driven dependency injection:

@Override
protected void init() {
addComponentInstantiationListener(new SpringComponentInjector(this));
}


Then we need an application context xml configuration file. This should look like this:

<tx:annotation-driven />

<bean id="persistenceManagerFactory"
class="org.springframework.orm.jdo.LocalPersistenceManagerFactoryBean">
<property name="persistenceManagerFactoryName"
value="transactions-optional" />
</bean>

<bean id="transactionManager"
class="org.springframework.orm.jdo.JdoTransactionManager">
<property name="persistenceManagerFactory" ref="persistenceManagerFactory" />
</bean>


On GAE we cannot use component-scanning or annotation-driven configuration with <configuration:annotation-driven/>, since this introduces a dependency on javax.Naming, which is not on the GAE whitelist. So we have to configure our beans through XML. But we can use annotation-driven transaction configuration.

For persistence I chose JDO instead of JPA. GAE is backed by BigTable as a datastore, and since BigTable isn't a relational database, I thought JDO might be a better fit. But JPA might be a good choice, as well. For JDO we have to configure a LocalPersistenceManagerFactoryBean and a JDO transaction manager. The factory's name must match the name in the jdoconfig.xml file, which is normally created by the Eclipse plugin. The sample application also contains a simple persistence manager factory bean for JPA, that works on GAE.

After that we can create transactional services and DAOs as Spring beans. But first, let's set up a simple, persistable domain model.

Domain Model / Persistence
Our first persistable domain object class is a person pojo entity with some JDO annotations, the persistence meta data (similar to JPA):

@PersistenceCapable(identityType = IdentityType.APPLICATION)
public class Person {

@PrimaryKey
@Persistent(valueStrategy = IdGeneratorStrategy.IDENTITY)
private Long id;

@Persistent
private String firstName;

@Persistent
private String lastName;

@Persistent
private Date birthday;

public Person() {
super();
}

public Person(final Date birthday,
final String firstName,
final String lastName) {
super();
this.birthday = birthday;
this.firstName = firstName;
this.lastName = lastName;
}

public Long getId() {
return id;
}

// ... Getters and Setters


All persistent entities have to be annotated with @PersistenceCapable. The primary key is annotated with @PrimaryKey. On GAE/BigTable primary keys have special semantics in addition to just uniquely identifying an entity, see the GAE documentation for details. For this example, we'll keep things simple and just choose the primary key to be of type Long (we'll change that later for some reason). All persistent fields have to be annotated with @Persistent.

That's it, for this simple entity for now. Let's go for actually persisting it to the database.

Persisting entities
The sample application uses a PersonDAO to persist person entities. This DAO could inherit from Spring's JdoDaoSupport base class, but we can also do it without it. So, our DAO might look like this:

public class PersonDao /* extends JdoDaoSupport */
implements IPersonDao {

private PersistenceManagerFactory pmf;

@Override
public Person makePersistent(final Person person) {
return getPersistenceManager().makePersistent(
person);
}

private PersistenceManager getPersistenceManager() {
return PersistenceManagerFactoryUtils
.getPersistenceManager(pmf, true);
}

public void setPmf(final PersistenceManagerFactory pmf) {
this.pmf = pmf;
}

}

The PersistenceManagerFactory will be injected by Spring. If you look at the getPersistenceManagerFactory() method you'll notice, that it's not just pmf.getPersistenceManager(), instead it calls PersistenceManagerFactoryUtils to get a persistence manager. This way we get a persistence manager that participates in Spring's transaction handling, which cares for opening and closing the persistence manager and transaction handling on our behalf.

We configure this DAO by defining it as a Spring bean in the application context xml file and inject the PersistenceManagerFactory. We can then use the makePersistent(person) method to persist person instances.

At this point we could now easily implement a simple Wicket form to create new person instances. But I'll leave this task up to you (or have a look at the sample application).

Retrieving Entities
But let's have a closer look at JDO, for those not familiar with it (like me). What we'll probably want to do, for example, is to query a single person by ID or to find all persons, applying some paging parameters. Here are some sample methods from the Person DAO to get an impression of JDO:

public Person get(final Long id) {
final Person person = getPersistenceManager()
.getObjectById(Person.class, id);
return getPersistenceManager().detachCopy(person);
}

@Override
public int countPersons() {
final Query query = getPersistenceManager()
.newQuery(Person.class);
query.setResult("count(id)");
final Integer res = (Integer) query.execute();
return res;
}

@SuppressWarnings("unchecked")
public List<Person> findAllPersons() {
final Query query = getPersistenceManager()
.newQuery(Person.class);
query.setOrdering("lastName asc");
final List<Person> list = (List<Person>) query
.execute();
return Lists.newArrayList(getPersistenceManager()
.detachCopyAll(list));
}

@Override
@SuppressWarnings("unchecked")
public List<Person> findAllPersons(final int first,
final int count) {
final Query query = getPersistenceManager()
.newQuery(Person.class);

query.setOrdering("lastName asc");
query.setRange(first, first + count);

final List<Person> list = (List<Person>) query
.execute();
return Lists.newArrayList(getPersistenceManager()
.detachCopyAll(list));
}

For further details about querying with JDO, see the resources section below. Especially for JDO on GAE, there are quite some restrictions. I think, for example, it's not possible to do something like wildcard matching in queries.

One word on detaching: all the DAO methods above detach the retrieved entities before returning them to the caller by calling detachCopy or detachCopyAll. This way the entities are detached from the persistence manager that fetched them. These instances can then be modified by the web layer and passed back to another persistence manager instance in order to update their database representation. The sample application uses the OpenPersistenceManagerInView pattern instead, configured in web.xml. This way, a persistence manager instance is opened at the beginning of the request and closed afterwards, so the web layer can freely navigate the object graph.

Mapping relationships
Let's add a simple relationship to our domain model. Assume a person has a one-to-many relationship to phone numbers. In GAE such a relationship could be owned or unowned. In an owned relationship the entities on the one side are the parents of the associated entities, which are then called child entities in this relationship. Child entities in an owned relationship cannot exist without their parents. For more information on the different types of relationships and their transaction semantics, see the GAE documentation. The following relationship between persons and phone numbers is an owned, bi-directional one-to-many relationship.

@PersistenceCapable(identityType = IdentityType.APPLICATION)
public class PhoneNumber {

@PrimaryKey
@Persistent(valueStrategy = IdGeneratorStrategy.IDENTITY)
private Key key;

@Persistent
private String type;

@Persistent
private String number;

@Persistent
private Person person;

//...


The phone number has a field person of type Person, annotated with @Persistent. This makes phone number a child entity of person. You'll notice the field key of type Key. This is a possible type for primary keys in the GAE. We cannot use Long in this case, because phone number is a child entity of person and as such its primary key has to contain the key of its parent (see the docs).

Note: For root entities, it's normally okay to use a key of type Long, but this did not work in my example, so I changed the key of Person to Key, too.


public class Person {

@PrimaryKey
@Persistent(valueStrategy = IdGeneratorStrategy.IDENTITY)
private Key key;

@Persistent
private String firstName;

@Persistent
private String lastName;

@Persistent
private Date birthday;

@Persistent(mappedBy = "person")
private List<PhoneNumber> phoneNumbers = Lists.newArrayList();

// ...


The relationship is made bi-directional by adding a list of phone numbers to the person class. The mappedBy parameter denotes the property of PhoneNumber that points to the person. With this, we can now add phone numbers to persons and these will be persisted to the database along with the owning person.

Note: Somehow there's an issue with removing phone numbers from the list by calling person.getPhoneNumbers().remove(phoneNumber), which throws an exception. But removing it by its index works, though. Let me say, that this was not the only time I had problems with the datastore. I have quite a feeling that there are still some open issues in this area.

UserService
To close this post, I'll shortly describe GAE's simple support for authentication. In a GAE application users may login with their Google account.

Checking, if a user is logged in, is easy:

final UserService userService = UserServiceFactory.getUserService();
boolean loggedIn = userService.isUserLoggedIn();


Accessing the current user's details is also easy:

User currentUser = userService.getCurrentUser();
String email = currentUser.getEmail();
String nickname = currentUser.getNickname();


And redirecting a user to a login/logout URL in Wicket can be done e.g. with a ExternalLink:

class LoginLink extends ExternalLink {

private static final long serialVersionUID = 1L;

LoginLink(final String id) {
super(id, getURL());
add(new Label("label", new LoginLabelModel()));
}

public static String getURL() {

final RequestCycle requestCycle = RequestCycle.get();

// Get the URL of this app to redirect to it
final WebRequest request = (WebRequest) requestCycle.getRequest();
final HttpServletRequest req = request.getHttpServletRequest();
final String appUrl = req.getRequestURL().toString();

// Create the login/logout page URL with with redirect tho this app
final String targetUrl = getUserService().isUserLoggedIn() ? loginUrl(appUrl)
: logoutUrl(appUrl);

return targetUrl;

}


Resources
[1] The sample application source code
[2] Apache JDO
[3] JDO Spec
[4] GAE datastore docs


Thursday, July 2, 2009

Java vs. Scala vs. Groovy - Performance Update

It's been quite a while since my post on the micro benchmark comparison between Java, Scala and Groovy. Since the Groovy developers tackled some performance issues with the Groovy 1.6 release, I thought, I'd give it another try. I used Groovy 1.6.3, Scala 2.7.5 and JDK 1.6.0 Update 14. I left the code that I used for the last comparison unchanged. I did not make much use of any specific language features, so it's quite a straightforward quicksort implementation, see the code below.

The Result
Before showing the result, just let me make clear, that I love the Groovy ;-) But seriously, after the anouncement, that the performance was one of the primary goals for the Groovy 1.6 release, I was a bit disappointed. We'll have to keep in mind though, that this is just a (poorly written) micro benchmark, that doesn't mean anything. And after all, it's all about the groovy language features anyway.

Nuff said, here is the result of sorting 100.000 integers:

1. Java: 45ms
2. Scala: 56ms
3. Groovy: 12800ms


And here's the code:

Java

public class QuicksortJava {

public static void swap(int[] a, int i, int j) {
int temp = a[i];
a[i] = a[j];
a[j] = temp;
}

public static void quicksort(int[] a, int L, int R) {
int m = a[(L + R) / 2];
int i = L;
int j = R;
while (i <= j) {
while (a[i] < m)
i++;
while (a[j] > m)
j--;
if (i <= j) {
swap(a, i, j);
i++;
j--;
}
}
if (L < j)
quicksort(a, L, j);
if (R > i)
quicksort(a, i, R);
}

public static void quicksort(int[] a) {
quicksort(a, 0, a.length - 1);
}

public static void main(String[] args) {

// Sample data
int[] a = new int[100000];
for (int i = 0; i < a.length; i++) {
a[i] = i * 3 / 2 + 1;
if (i % 3 == 0)
a[i] = -a[i];
}

long t1 = System.currentTimeMillis();
quicksort(a);
long t2 = System.currentTimeMillis();
System.out.println(t2 - t1);

}

}


Scala

package quicksort

object QuicksortScala {

def quicksort(xs: Array[Int]) {

def swap(i: Int, j: Int) {
val t = xs(i); xs(i) = xs(j); xs(j) = t
}

def sort1(l: Int, r: Int) {
val pivot = xs((l + r) / 2)
var i = l;
var j = r
while (i <= j) {
while (xs(i) < pivot) i += 1
while (xs(j) > pivot) j -= 1
if (i <= j) {
swap(i, j)
i += 1
j -= 1
}
}
if (l < j) sort1(l, j)
if (r > i) sort1(i, r)
}
sort1(0, xs.length - 1)
}

def main(args : Array[String]) {
var a : Array[Int] = new Array[Int](100000)
var i : Int = 0
for (e <- a) {
a(i) = i*3/2+1;
if (i%3==0) a(i) = -a(i);
i = i+1
}
val t1 = System.currentTimeMillis();
quicksort (a)
val t2 = System.currentTimeMillis();
println(t2-t1)
}
}


Groovy

def swap(a, i, j) {
temp = a[i]
a[i] = a[j]
a[j] = temp
}

def quicksort(a, L, R) {
m = a[((L+R)/2).intValue()]
i=L
j=R
while (i<=j) {
while (a[i]<m) i++
while (a[j]>m) j--
if (i<=j) {
swap(a, i, j)
i++
j--
}
}
if (L<j) quicksort(a,L,j)
if (R>i) quicksort(a,i,R)
}

def quicksort(a) {
quicksort(a, 0, a.length-1)
}

// Sample data
a = new int[100000]
a.eachWithIndex {x, i ->
a[i] = i*3/2+1
if (i%3==0) a[i] = -a[i]
}

t1 = System.currentTimeMillis()
quicksort(a)
t2 = System.currentTimeMillis()
println t2-t1


Note: There was a bug in Scala code of the first version of this post, which is now fixed. Scala now goes slightly better.

Tuesday, May 26, 2009

Eclipse Galileo Release


The upcoming Eclipse Galileo Release is currently in RC state. This post highlights some of the new features.

Update-Manager
Finally, the update manager works again. With the Ganymede release I really had huge problems to install updates, both on my working machine and my personal machine. Mostly because of some strange error messages. In Galileo the update manager works fine and its design has been improved.

Tabbing
One thing that always bothered me in previous versions of Eclipse was an issue with tabbing through opened editors by hitting Ctrl+PgUp/PgDown. As soon as you tabbed into an tab which itself had multiple tabs (such as the XML editor has a source tab and a design tab) you simply could not tab further outside of this tab.


Now this works fine. Within an editor with multiple tabs you can tab through the tabs with Alt+PgUp/PgDown.

toString() generation
Another nice thing is, that you can generate toString() automatically from the source menu.
The dialog lets you customize the way in which it's generated with different aspects: the fields to be included, the template to be used, a style (String concatenation, StringBuilder, String.format, ...) and other options (e.g. null-value handling).


Open Type
The "Open Type" dialog (Ctrl+T) allows for searching by type name patterns, e.g. the camel case letters. That's not new. But now these pattern latters are highlighted. The "Open Resource" dialog does not support this feature, though.


Rectangular selection
Editors now support rectangular selection. Press Alt+Shift+A to activate. Might be helpful in some situations.


Rename via Quick fix
Rename refactoring is available via Quick fix (Ctrl+1).


Constructor auto completion
The auto completion feature now is able to show all available constructors of a class. Before, only the type was available for selection.


Support for inheritDoc
The JavaDoc view now support the inheritDoc tag.


Mylyn planning icon
This is a minor one. Mylyn makes it easier to set the scheduling of a task by adding a button to the task editor's toolbar.


Compare View
In the Compare Editor many enhancements have been made, but I haven't had a deeper look at these. New Features include some of the features of the Java Editor, including auto completion, hyperlinking, java doc on hover, go to line and quick outline.

Patch pasting
Sounds nice, but haven't tried it yet: It's possible to apply a patch by simply pasting in the project explorer.

Still Line Break Issues
One thing that not has been fixed, is that sometimes when Generics are used, the formatter does not break the line even if it contains more characters than the maximum allowed.

Monday, April 27, 2009

Wicket Patterns and Pitfalls #5

This is the fifth article in a series of articles about common patterns and pitfalls when using Wicket (http://wicket.apache.org). Most of these patterns apply only when using Wicket in conjunction with Spring and Hibernate and these might be very specific, but others are more general. The last article was about the pitfalls related to Wickets HTTP session usage. This time a pattern for dataproviders for lists of associated entities is shown.

Data Providers for Indexed Lists


Environment: Wicket

Example Environment: Wicket, Spring, Hibernate


IDataProviders in Wicket are used to provide data to data views, such as DataTables for instance. The data provider interface has three methods:

public interface IDataProvider extends IDetachable {

Iterator iterator(int first, int count);

int size();

IModel model(Object object);

}

The iterator(first, count) method returns an iterator, that iterates over the actual data. The range is is used to get a subset of that data, e.g. for paging. The size() method returns the total number of possible result values. The objects returned by the iterator are then passed to the model() method to wrap the entity into a model, generally this should be a LoadableDetachableModel.

There are many ways to implement a data provider depending on the situation. This article sets the focus on the special case of implementing a data provider for a list of objects that are associated by another object, for example the orders of a person.

The Example
As an example, let's take an entity Person that references some Orders:


@Entity
public class Person {

@Id @GeneratedValue(strategy = GenerationType.AUTO)
private Long id;

private String lastName;
private String firstName;
private String username;

@OneToMany(mappedBy = "person")
private List<Order> orders = new ArrayList<Order>();
...
}


... and a panel that displays the orders of a person:


public class PersonOrdersPanel extends Panel {

public PersonOrdersPanel(String id,
final IModel personModel) {
super(id, personModel);

Person person = (Person) personModel.getObject();
IDataProvider dataprovider =
new PersonOrdersDataProvider(person.getId());

IColumn[] columns = ...

add(new DataTable("table", columns, dataprovider, 10));
}
}

The panel is provided a person model and it uses a Wicket DataTable to display the details of the person's orders. DataTable requires an IDataProvider that delivers the orders. Let's have a look at different implementations of such a data provider, that retrieves the orders of a person.

A DAO data provider
The first thing, that comes to my mind when thinking about how to implement the order data provider, is using a DAO that fetches the person's orders from the database.

public class PersonOrdersDataProvider implements
IDataProvider {

@SpringBean
private IOrderDao orderDao;

private final Long personId;

public PersonOrdersDataProvider(Long personId) {
this.personId = personId;
InjectorHolder.getInjector().inject(this);
}

public Iterator iterator(int first, int count) {
return orderDao.findByPerson(personId,
first, count).iterator();
}

public IModel model(Object object) {
return new GenericLoadableDetachableModel<Order>(
(Order) object);
}

public int size() {
return orderDao
.findByPersonCount(personId);
}

public void detach() {
}
}

This data provider implementation uses a @SpringBean annotated OrderDao, which is injected by the constructor. The constructor takes the person's database ID as an argument. The iterator() method uses the order DAO to find the orders of the person with this ID. size() calls the DAO to get the total number of the person's orders. The model() method returns a GenericLoadableDetachableModel for an order, which loads the order by its ID (see the previous article for a description of GenericLoadableDetachableModel).

While this implementation works well, it's quite an effort, to implement it. We need an order DAO and we have to implement the findByPerson(first, count) and findByPersonCount(personId) methods. We have to write some injection code, and we need a suitable model for the orders (this is no effort, if you have a GenericLoadableDetachableModel, though). Another issue is, that it only works for entities, not for value objects (e.g. Hibernate @Embeddables), as these don't have an ID, so it's hard to implement a LoadableDetachableModel for these. Also, this implementation results in a separate database query for the orders, although the person already might be referencing them.

A model based data provider
Another implementation could depend only on the person model, or in general, on the model for the entity that associates the list of objects we need a data provider for. Let's take a look:

public class PersonOrdersDataProvider implements
IDataProvider {

private final IModel personModel;

public PersonOrdersDataProvider(
IModel personModel) {
this.personModel = personModel;
}

public Iterator iterator(int first, int count) {
return getPerson().getOrders().subList(
first, first + count).iterator();
}

public IModel model(Object object) {
int index = getPerson().getOrders()
.indexOf(object);
return new PropertyModel(personModel,
"orders." + index);
}

public int size() {
return getPerson().getOrders().size();
}

public void detach() {
// personModel gets detached somewhere else
}

// helper
private Person getPerson() {
Person person = (Person) personModel
.getObject();
return person;
}
}

This shows a data provider that does not use a DAO, but instead completely relies on the person model. This is passed as an argument to the constructor and assigned to an instance variable. The iterator() method pulls the person out of this model and creates a sublist of the list of orders referenced by the person. Also, size() just returns the size of the orders list of the person. The model() method returns a PropertyModel based on the person model, indexing into the orders property (PropertyModel expressions support indexing). The index is the index of the order in the list of orders.

With this implementation there's no need for a DAO or a separate database query. There is no special model needed for the orders and it also works for value objects.

Alternative model based data provider
There is a variant of the previous data provider implementation, that I even like a little bit more, as it is kind of more explicit. The only difference is in the iterator() and model() methods:

public class PersonOrdersDataProvider implements
IDataProvider {

...

public Iterator iterator(int first, int count) {
return new RangeIterator(first, count);
}

public IModel model(Object object) {
Integer index = (Integer) object;
return new PropertyModel(personModel,
"orders." + index);
}

...

}

This time iterator() really just returns an iterator that iterates over the indexes of orders in the list of orders of the person. It returns a RangeIterator that iterates over the integers in the range [first, first + count] (this is not difficult to implement). In consequence this index is passed to the model method, which again returns a PropertyModel indexing into the orders property of the person model.

Conclusion
I think, this article shows a way to implement a data provider that's a bit more elegant than the conventional way. An additional benefit is, that it can also be used for lists of value objects. Also, it allows for a generic implementation, that can be reused for different entities.

A drawback is, that it performs worse than the DAO data provider when it comes to huge datasets, because it loads all elements of the collection, which might not be necessary if you use an OR-Mapper that supports lazy loading. The DAO data provider can restrict the number of results that are fetched from the database, if you want to implement some kind of paging. On the other hand if you really want to display all elements of the collections, you could fetch the person including the orders within a single query with the model based dataprovider.


Thursday, April 9, 2009

Wicket on Google App Engine

Google App Engine now supports Java. Let's get Wicket running on it, quickly.

Note: This post covers the basics of setting up Wicket on GAE. This subsequent post takes the next steps of setting up Spring and persistence with JDO and provides the source code of a sample application.

1. Use the Eclipse plugin to create a project
The Eclipse plugin can be installed via Eclipse Update Manager and it includes a Google App Engine SDK, so you don't need to install that separately. With the plugin, create a "New Web Application Project".


Uncheck "Use Google Web Toolkit" and leave "Use Google App Engine" activated. The project will contain a src folder and war folder. It contains a simple "Hello, World" example and you can run it immediately. But let's get Wicket running, quickly.


2. Add Wicket jars
Add the following jars to the war/WEB-INF/lib directory and add them as external jars to the eclipse project:

- wicket-1.3.5.jar
- slf4j-api-1.5.2.jar
- slf4j-log4j12-1.4.2.jar
- log4j-1.2.13.jar


3. Turn on logging
Turn on logging, so that you can see any strange things, that may occur. App Engine won't tell you much by default.

- log4j.properties: log4j.logger.org.apache.wicket=DEBUG, A1
- java6 logging.properties: .level = INFO

4. Create a Wicket Application and a Page
Add WicketApplication.java

package wicket;

public class WicketApplication extends WebApplication {
public Class getHomePage() {
return HomePage.class;
}
}

and a simple HomePage.java and HomePage.html:

public class HomePage extends WebPage {
public HomePage() {
add(new Label("label", new Model("Hello, World")));
}
}


5. Set up WicketFilter
Add the Wicket servlet filter to web.xml. Alternatively use WicketServlet:


WicketFilter
org.apache.wicket.protocol.http.WicketFilter

applicationClassName
wicket.WicketApplication


WicketFilter
/wicket/*


6. Add HTTP session support
Enable HTTP session support (by default it's disabled) by adding the following line to appengine-web.xml:

true


Now the app is ready to run, but there are still some issues.

7. Disable resource modification watching
When Wicket is started in development mode now, exceptions are raised because Wicket spawns threads to check resource files such as HTML files for modifications. Let's just disable resource modification checking by setting the resource poll frequency in our WicketApplication's init() method to null.

protected void init() {
getResourceSettings().setResourcePollFrequency(null);
}

8. Disable SecondLevelCacheSessionStore
We cannot use the SecondLevelCacheSessionStore in the app engine, which is the default. At least not with a DiskPageStore, because this serializes the pages to the disk. But writing to the disk is not allowed in the app engine. You can use the simple HttpSessionStore implementation instead (this increases HTTP session size), by overriding newSessionStore() in our WicketApplication:

protected ISessionStore newSessionStore() {
//return new SecondLevelCacheSessionStore(this, new DiskPageStore());
return new HttpSessionStore(this);
}


9. Run
From the context menu of the project, call Run As -> Web Application. Open http://localhost:8080/wicket/ in your browser and see the app running.


Download the demo as an eclipse poject.


Tuesday, April 7, 2009

Wicket Patterns and Pitfalls #4

This is the fourth article in a series of articles about common patterns and pitfalls when using Wicket (http://wicket.apache.org). Most of these patterns apply only when using Wicket in conjunction with Spring and Hibernate and these might be very specific, but others are more general. The last article was about the OSIV-LDM-Pattern and its pitfalls. This time it's about HTTP session pitfalls.

Wicket Session Pitfalls


Environment: Wicket, Spring

Example Environment: Wicket, Spring, Hibernate, OpenSessionInView


When Wicket processes a request, the component hierarchy including the models is constructed, then events are processed, the response is rendered, and finally the components and models are put into the PageMap. This is Wicket's way of storing state. The PageMap in turn is put into the Wicket session, which is put into a SessionStore, which is put into the HttpSession (by default). And as the HttpSession is a critical resource, one has to take care of the size of the components. Especially, the size of the models, that are attached to the components, can be of critical size - imagine huge amounts of table data or large object graphs. For this reason, Wicket provides models, which get detached at the end of the request, so that their model objects will not be put into the session (this generally means nulling out transient fields). But there are still some cases, where model objects are accidently put into the session. This article sheds some light on these cases.

The Example
As an example to demonstrate these cases, let's take an entity Person ...

@Entity
public class Person {
@Id @GeneratedValue(strategy = GenerationType.AUTO)
private Long id;
private String lastName;
private String firstName;
...
}

... and a very simple page that displays the details of a person:

public class PersonPage extends WebPage {

public PersonPage(final Person person) {
super(new Model(person));

add(new Label("firstName",
new PropertyModel(person, "firstName")));
add(new Label("lastName",
new PropertyModel(person, "lastName")));
add(new Label("username",
new PropertyModel(person, "username")));

Link link = new Link("editLink") {
public void onClick() {
setResponsePage(
new PersonEditPage(person));
}
};
add(link);

}
}

The person entity is provided as an argument to the constructor. We call super() with a new Model(person) to associate the person model with the page, so we can get a handle to the person later on. Then we add some labels to display the details of a person. We provide PropertyModels to the labels, which are used to access a property of the person using a property expression. Finally, we add a Link, which directs the user to the PersonEditPage, where the user details can be edited. We do so by setting the response page to a new PersonEditPage(person). We pass the person instance, that was provided to the constructor of PersonPage, to the edit page.

So, this is a really, really simple page. And in fact, it has some flaws, so that the person entity is put into the session. This is something we wouldn't want, because the person may be connected to a larger object graph (e.g. person references some orders, which reference some line items, which references items, ...), which would all be put into the session as well.

The person entity in this example is put into the session for different reasons. The following sections describe these reasons and give some rules to prevent model objects from getting put into the session.

Rule #1: Use detachable models for entities
The first one is a very basic one. In the example above, the person is passed as an argument to the constructor and then it's put into a newly created Model instance. Now, Model is the basic implementation of an IModel (the base model interface in Wicket) and it does no more than keeping a reference to the entity, which is returned by getObject() - no detaching at all. In fact, the constructor of the Model class gives a hint that the model object is put into to the session: it just accepts model objects as an argument that implement Serializable.

Model is not the only implementation of IModel that does not detach entities. For example, PropertyModels and CompoundPropertyModels don't detach entites either. These models do some other kind of detaching, though, which is shown in the next section. But first, let's see, what we can do about the problem here. We are looking for an IModel implementation that implements detach() (inherited from IDetachable) in a suitable way, i.e. detaching the entity from the model after the request. And in this case, we could use a LoadableDetachableModel. LoadableDetachableModel requires you to implement the abstract method load(), which is meant to return the entity (e.g. fetch it from the database). When getObject() of LoadableDetachableModel is called, it calls load() to fetch the entity and assigns it to a transient field. At the end of a request, detach() is called, which nulls out this transient field, so the entity is not put into the session.

Rule #2: Rely on models, not on entities
The second reason, for which the person entity gets into the session in the example above, is the way the PropertyModels for the Labels are used. When new PropertyModel(person, "firstName") is called, the PropertyModel assigns the person instance to an internal, non-transient, never nulled-out instance variable. In this sense, PropertyModel is no better than an ordinary Model.

But we can still leverage the benefits of a PropertyModel as it implements IChainingModel in a proper way. That means, we can pass another person model to it as an argument instead of the entity itself, and it will chain through the calls to getObject(), detach() and so on. So, if we pass a LoadableDetachableModel for the person to the PropertyModel, we are fine: new PropertyModel(loadableDetachablePersonModel, "firstName"). So, whenever it is possible, we should build models that rely on other models instead of the entities directly.

Rule #3: Do not assign entities to instance variables
The example above does not violate this rule, so here is a variation of the PersonPage that does:

public class PersonPage extends WebPage {

private Person person;

public PersonPage(final Person person) {
this.person = person;
...
}
}

In this case, the person instance gets put into the session, simply because the page is put into the session, as all components are. It's easy to follow this rule. Just follow rule #1 and rule #2.

Rule #4: Do not circumvent @SpringBean proxies
This rule is kind of the same as rule #3 but related to @SpringBean annotated fields (when using Wicket in Spring container). When a field of a component is injected with the use of @SpringBean, what really is assigned to the field is a proxy of that spring bean.

public class PersonPage extends WebPage {

@SpringBean
private PersonDao personDao;

public PersonPage(final Person person) {
...
}
}

As this is a lightweight proxy of the PersonDao, rule #3 is not violated. In fact, the @SpringBean-proxy-mechanism is a good example of following rule #3. Anyway, while it's okay to keep a reference to this proxy, it's not okay, to pull other spring beans out of the proxy and assign them to instance variables. Example:

public class PersonPage extends WebPage {

@SpringBean
private PersonDao personDao;

public PersonPage(final Person person) {
super(new PersonModel(
personDao.getSessionFactory(),
person.getId());
...
}
}

public class PersonModel
extends LoadableDetachableModel {

private SessionFactory sessionFactory;
private Long personId;

public PersonModel(SessionFactory sessionFactory,
personId) {
this.sessionFactory = sessionFactory;
this.personId = personId;
}

public Object load() {
return sessionFactory.get(personId);
}
}

When personDao.getSessionFactory() is called, the real sessionFactory is returned, of coures. No proxy. Then it's passed to the PersonModel which holds a reference to it, and the sessionFactory will be put into the session along with this model. We can prevent this by injecting the session factory by using @SpringBean as well.

Rule #5: Implement anonymous inner classes carefully
The PersonPage in the example uses a Wicket Link to redirect the user to the person edit page. The Link is implemented as an anonymous inner class in order to implement its abstract method onClick(). Many Wicket components are implemented this way, and as a result, anonymous inner classes are very common in Wicket.

public PersonPage(final Person person) {
super(new PersonModel(person));
...

Link link = new Link("editLink") {
public void onClick() {
setResponsePage(new PersonEditPage(person));
}
};
add(link);
}

The onClick() method is implemented in the most straightforward way. The person instance, which was passed as an argument to the constructor of PersonPage, is passed to the constructor of PersonEditPage, which is set as the response page. It's not easy to see immediately, how the person is getting into the session now, but in fact it's put there. And it can happen as easily in many other cases using anonymous inner classes.

This is because in Java, when an inner class, declared in a method (or constructor), accesses a variable of its declaring method, such as an argument or a local variable, this variable effectively becomes a member of this inner class. This is because these variables have to be declared final to be able to access them from inner classes. In the example above, the person parameter becomes an instance variable of the anonymous Link class, and as rule #3 has shown, instance variables are put into the session along with the components they belong to.

Rule #6: Always attach models to components
This rule also relates to rule #3. This time it's about models as instance variables. Let's add an instance variable of type IModel to the person edit page.

public class PersonPage extends WebPage {

private IModel accountModel;

public PersonPage(final Person person) {

super(new PersonModel(person);

this.accountModel = new AccountModel(
person.getAccount());
}
}

Let PersonModel and AccountModel be properly implemented LoadableDetachableModels. So what's wrong with assigning a LoadableDetachableModel to an instance variable? After all, it's a lightweight model and the PersonModel is assigned to an instance variable somewhere in the page hierarchy, too.

Actually, the PersonModel is assigned to a component, which takes care of detaching the model. A LoadableDetachableModel has to be detached by some component that knows about this model. And this is not the case with the accountModel. No component ever calls its detach() method, as it's not attached to a component as a model. We could implement some detachment logic for this model in the person page, though.

Conclusion
The conclusion of this article is simple: If you use objects of some serious weight in components, don't use them directly. Instead use an IModel implementation, that implements a proper detachment logic, or use some kind of other leightweight representation of that object like an ID or a @SpringBean proxy.