This post gives a short introduction of how to build a Google Wave robot. The goal is to build a robot that takes user input as a Groovy script, evaluates it and displays the result back in the wave. To avoid any misunderstanding, the robot itself is not written in Groovy but in Java (shame on me ;-) and uses GroovyShell to evaluate Groovy code. For the impatient (with a Google Wave account) who want try the robot, it's address is groovybot@appspot.com. See the resources section for source code.
Introduction to Google Wave
Google Wave is a communication and collaboration platform, where people can participate in conversations. It's kind of like an e-mail conversation but in real-time like a chat, and much more interactive, with much more features. A conversation, consisting of one or more participants, is called a wave. A wave is a container for wavelets, which are threaded conversations, spawned from a wave. Wavelets are a container for messages, called blips. For more details, see the Google Wave documentation.
Google Wave Extensions
There are two types of Google Wave extensions - gadgets and robots. A gadget basically is a component containing some HTML and JavaScript, that can be included in a wave conversation. But as GroovyBot currently does not make use of gadgets (yet), I won't consider gadgets any further in this post. The other type of wave extension is robots, and as the name suggests, GroovyBot is of this type of extension. A robot is a certain kind of web application that can participate in a wave conversation just as a human participant. And just as a human participant, it can be added to a conversation and then react to certain kinds of events in the wave, e.g. when it's added to the wave or somebody submitted a message (a blip). In response, it can then modifiy the content of the conversation, e.g. by appending content or replacing content.
Getting Started
Currently robots have to be deployed to the Google App Engine. Fortunately, it's really easy to get started with Google App Engine. First you'll need to sign up for an accout. Then with the Eclipse plugin for the app engine create an application, just like shown in this post. This will create a simple Servlet web application, which can immediately be deployed on app engine. But we don't want a simple servlet application. Let's see how to build a wave robot.
Building a Robot
First of all, we need the Google Wave Java Client API, which consists of four jar files, and (for this particular robot) the Groovy jar groovy-all-1.6.5.jar. Place these in the
war/lib directory and add them to the build path of your Eclipse project. Then we create the robot, which is simply a class extending AbstractRobotServlet. We'll name it GroovyBotServlet:
public class GroovyBotServlet
        extends AbstractRobotServlet {

   @Override
   public void processEvents(
        RobotMessageBundle bundle) {
     // TODO
   }

}
As said, a robot is basically a wave participant, which can react to certain events happening in the wave conversation. The event handling is done in the
processEvents method. All information about the event and the context in which the event ocured, like the wavelet, the blip, the participants and so on, is contained in the RobotMessageBundle parameter. The robot servlet has to be mapped to the URL path /_wave/robot/jsonrpc in the web.xml.The first thing we'd like to do is to show a simple message in the wave, when the robot is added as a participant. The wave API provides a convenience method called
wasSelfAdded to check for this particular event:
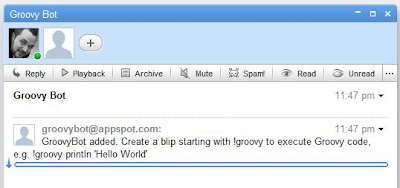
public void processEvents(RobotMessageBundle bundle) {

  if (bundle.wasSelfAdded()) {
    final Blip blip = bundle.getWavelet().appendBlip();
    final TextView textView = blip.getDocument();
    textView.append("GroovyBot added!");
  }

}
So, if the robot was just added to the wave, we get the wavelet in which the event occured, append a blip to it and add the message to the blip's document. The result looks like this:
This was easy, and to make the robot run a Groovy script and display the result back in the wave is not much harder.
Executing Groovy Scripts
GroovyBot should not execute all messages submitted to the wave as a Groovy script. Instead, if the user wants the content of a blip to be executed as a script, the blip has to start with the prefix '!groovy' followed by the code, e.g.

The event we want to react to is a
BLIP_SUBMITTED event. We have to tell wave that our robot is interested in events of this type by specifying this in the file war/_wave/capabilities.xml:
<?xml version="1.0" encoding="utf-8"?>
<w:robot xmlns:w="http://wave.google.com/extensions/robots/1.0">
<w:capabilities>
 <w:capability name="BLIP_SUBMITTED" content="true" />
</w:capabilities>
<w:version>0.1</w:version>
</w:robot>
Then we modify the
processEvents method to handle these events:
public void processEvents(
            final RobotMessageBundle bundle) {

for (final Event e : bundle.getEvents()) {

  if (e.getType() == EventType.BLIP_SUBMITTED) {

    // Get input
    final Blip inputBlip = e.getBlip();
    final TextView inputDocument =
            inputBlip.getDocument();
    final String inputText = inputDocument.getText();

    if (inputText.startsWith("!groovy")) {
        final String script = inputText
                .substring("!groovy".length());

        // Execute script
        final GroovyShell shell = new GroovyShell();
        final StringBuilder result =
                new StringBuilder("Result: ");
        try {
            result.append(shell
                    .evaluate(script));
        } catch (final Exception ex) {
            result.append(e.toString());
        }

        // Create response
        final Blip blip = bundle.getWavelet()
                .appendBlip();
        blip.getDocument().append(result.toString());
     }
   }
}
This code first checks if there is an event of type
BLIP_SUBMITTED. If so, it gets the blips contents and checks for the prefix "!groovy". Then it removes the prefix, executes the remaining content as a Groovy script with GroovyShell and appends a blip with the result. The output will look like this: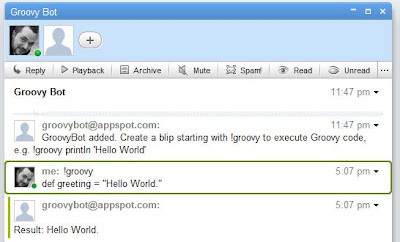
Conclusion
That's basically all, to build a simple Groovy robot. The code above shows a simplified version of GroovyBot which is currently deployed, though. It could be improved in many ways, for example
System.out could be captured and also shown in the output. Also, the result could be displayed in another way for a better user experience, for example as a child blip, an inline blip or even as a gadget. But I ran into some issues trying this, for example inline blips were not displayed, or child blips could not be removed and re-added. There are some known bugs in the client API, but all in all, I had a really good experience with wave and its client API. There are many things left, I'd like to do, for example syntax highlighting, using a gadget or making some predefined scripts available, e.g. some DSLs. If you've got some ideas, for example what would be a better user experience, you are welcome. You can start trying GroovyBot right now. It's address is groovybot@appspot.com. Why don't you start with this example, taken from the Practically Groovy series:
!groovy
def zip = "80020"
def addr = "http://weather.yahooapis.com/forecastrss?p=${zip}"
def rss = new XmlSlurper().parse(addr)
def results = rss.channel.item.title
results << "\n" + rss.channel.item.condition.@text
results << "\nTemp: " + rss.channel.item.condition.@temp
println results
Resources
[1] Google Wave
[2] GroovyBot at GitHub (Source Code)
[3] Google Wave Jave Robots Tutorial
[4] Google App Engine


3 comments:
Nick,
Very nice article. Exactly what I was looking for :)
However, I am struglling with it. All I get on my wave is this:
java.lang.NoClassDefFoundError: groovy/lang/GroovyShell
...
Caused by: java.lang.ClassNotFoundException: groovy.lang.GroovyShell
at com.google.appengine.runtime.Request.process-dd513586ce376f48(Request.java)
I had to add some stacktrace facility to your code in order to get a few more clues on what was going on, as I was not getting any blip from the robot :(
To me it seems like their java does not implement GroovyShell, but what I do not understand is, how come you got it to work. I have to be missing something.
Thank you for your advice,
David
@David: Seems to me that you've forgot to include the Groovy jars, i.e. groovy-all.jar. Sorry, forgot to mention that in the post.
I guess it's worth mentioning that Grails has standard plugins allowing it to run in AppEngine. So you could write your robot as a Grails app if it suited you.
Post a Comment